KONFIGURASI POP3 GMAIL PADA MICROSOFT OUTLOOK 2003
Langkah selanjutnya adalah melakukan setting pada Outlook.
- Buka Ms.Outlook.
- Klik pada menu Tools, dan pilih E-mail Accounts…
- Klik Add a new e-mail account, dan klik Next.
- Pilih POP3 sebagai server, dan klik Next.
- Isi semua kolom dengan informasi yang sesuai, seperti contoh berikut:
User Information
Your Name: Enter your name as you would like it to appear in the From: field of outgoing messages.
Email Address: Enter your full email address (username@gmail.com or username@your_domain.com)
Server Information
Google Apps users, enter the server names provided, don’t add your domain name in this step.
Incoming mail server (POP3): pop.gmail.com
Outgoing mail server (SMTP): smtp.gmail.com
Login Information
User Name: Enter your Gmail username (including @gmail.com). Google Apps users, enter your full address in the format username@your_domain.com
Password: Enter your email password
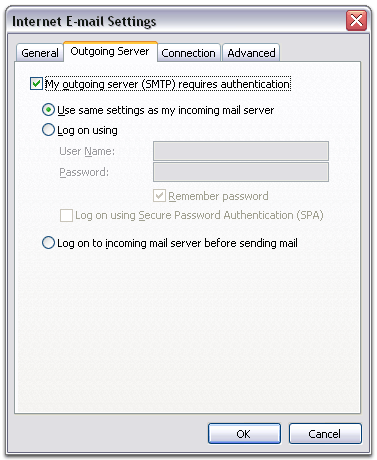
- Klik pada More Settings… kemudian klik pada tab Outgoing Server .
- Beri tanda Check box pada My outgoing server (SMTP) requires authentication kemudian pilih Use same settings as my incoming mail server.
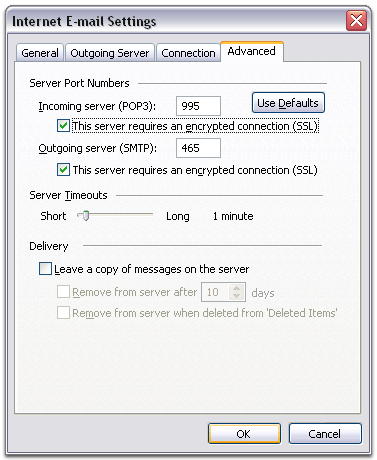
- Klik pada tab Advanced, beri tanda check box pada This server requires an encrypted connection (SSL) di bawah Incoming Server (POP3).
- Beri tanda check box pada This server requires an encrypted connection (SSL) di bawah Outgoing Server (SMTP), dan isi 465 pada box Outgoing server (SMTP) .
- Klik OK.
- Klik Test Account Settings… Setelah mendapatkan konfirmasi Congratulations! All tests completed successfully, klik Close.
- Klik Next, kemudian klik Finish.
Congratulations! Sekarang kamu sudah bisa mengirim dan menerima email menggunakan outlook.
No Comments
No comments yet.
RSS feed for comments on this post.
Sorry, the comment form is closed at this time.


